
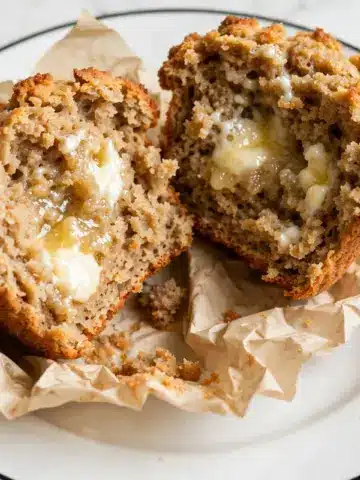
I am beyond excited to share my Gluten-Free English Muffins Recipe with you — it’s hands down one of my favorite homemade treats that brings all the charm of classic English muffins without the gluten. These muffins boast a delicate crust with that iconic nooks-and-crannies texture inside, perfect for holding melted butter or your favorite jam. I love how straightforward this recipe is, making it a cozy weekend project but also surprisingly doable any time you crave that warm, comforting bread experience that pairs perfectly with breakfast or tea time.
Why You'll Love This Gluten-Free English Muffins Recipe
What I absolutely adore about this Gluten-Free English Muffins Recipe is the way the flavor really comes together — there’s a subtle sweetness balanced by that slight tang from the yeast fermentation, and the texture is spot-on. They have that satisfying chew and those classic little air pockets that make each bite so delightful. It’s like enjoying a bakery treat right in your own kitchen, without the worry of gluten.
Another reason this recipe has won me over is how approachable it is. The steps are clear, and the ingredients are simple but purposeful, creating a dough that’s easy to handle once you get the hang of it. Whether you’re making breakfast for the family, hosting friends for brunch, or just treating yourself on a relaxed Sunday morning, this recipe feels special and versatile. It’s truly a standout because it proves gluten-free baking can be just as rewarding and delicious as the traditional kind.
Ingredients You'll Need

I love that the ingredients for these muffins are straightforward yet carefully chosen to ensure the perfect balance of flavor and texture. Each flour brings its own character, and the little touches like ground chia seeds help with binding naturally without gluten. This makes it a mindful recipe that tastes great and feels wholesome.
- Warm water: Activates the yeast and helps dissolve the sugar for a perfect rise.
- Cane sugar: Feeds the yeast for that beautiful bloom and subtle sweetness.
- Active dry yeast: The essential leavening that gives the muffins their airy texture.
- Ground chia seeds: Acts as a natural binder, adding moisture without gluten.
- Brown rice flour: Provides body to the dough and a neutral flavor base.
- Tapioca starch: Adds chewiness and elasticity for that classic muffin bite.
- Potato starch: Contributes to a light texture without heaviness.
- Oat flour: Offers a gentle nutty undertone and tender crumb, but be sure it’s gluten-free!
- Sea salt: Enhances all the flavors and balances the sweetness.
- Baking powder: Gives a subtle additional lift to the dough before cooking.
- Cornmeal: Sprinkled on the baking sheet to prevent sticking and add a slight crunch.
- Avocado oil: Perfect for greasing the pan without overpowering the flavor.
Directions
Step 1: I start by whisking ¾ cup of warm water with the cane sugar in a medium bowl until the sugar dissolves, then I whisk in the active dry yeast and let it bloom for 10 minutes. Watching that frothy layer appear is always so satisfying—it tells me the yeast is working its magic. If it doesn’t foam, it’s worth starting over to get that perfect rise.
Step 2: Once the yeast has bloomed, I whisk in the ground chia seeds and let that mixture gel for about 5 minutes. While it thickens, I mix together the dry ingredients—brown rice flour, tapioca starch, potato starch, oat flour, and salt—in a large bowl, combining everything evenly.
Step 3: I add the wet chia-yeast mixture to the center of the dry ingredients and stir with a wooden spoon until it forms a dense dough. I usually knead by hand for a couple of minutes to make sure everything is well incorporated. Covering it with a kitchen towel, I let the dough rise in a warm spot for one hour so it can get nice and puffy.
Step 4: After the first rise, I dissolve the baking powder into the remaining warm water and stir that into the dough. Mixing well with a spoon or hand mixer breaks up lumps and makes the dough thick and sticky again. I cover it back up and let it rest another 30 minutes—this second rest really helps develop the right texture.
Step 5: While it rests, I prepare a baking sheet with 1 tablespoon of cornmeal and preheat the oven to 350°F. I then add the remaining oat flour to the dough, stirring until it’s thick but not too sticky—sometimes I add a bit more flour if my hands get too messy. If I’m not making the muffins immediately, the dough can chill in the fridge for up to 12 hours which I find convenient for planning ahead.
Step 6: Time to shape! I divide the dough into six equal pieces and form each into a flat, round muffin shape about 3 inches across and ½-inch thick. Placing them on the cornmeal-coated baking sheet, I sprinkle the remaining cornmeal evenly over the tops for that lovely rustic crunch.
Step 7: Heating 1 teaspoon of avocado oil in a cast iron skillet or non-stick pan over medium heat, I sear the muffins for about 4-5 minutes on the first side until golden brown, then flip for another 3-4 minutes. I carefully transfer them back to the baking sheet and repeat until all muffins are cooked. Then they head into the oven for 10-15 minutes to finish baking and develop a firm crust—tapping them to listen for that hollow sound is my secret test for doneness.
Step 8: Once baked, I let the muffins cool for 10-15 minutes before serving. Instead of slicing, I love to use a fork to pull them apart along the sides, revealing their perfectly textured interiors. They’re delicious right away with butter and jam or toasted to crispy perfection later.
Servings and Timing
This Gluten-Free English Muffins Recipe yields 6 delightful muffins, ideal for sharing with family or stocking for quick breakfasts. The prep time is about 20 minutes, with two rises totaling approximately 1 hour 30 minutes. Cooking and baking take around 25 minutes, making the total active and inactive time near 2 hours 15 minutes. While the process requires patience, the hands-on time is quite manageable, especially with rests letting the dough work for you.
How to Serve This Gluten-Free English Muffins Recipe

When I serve these muffins, I love pairing them with a variety of toppings to match the mood or occasion. A classic is butter with jam—simple and utterly satisfying. For something heartier, I pile on smashed avocado with a sprinkle of sea salt and chili flakes or layer cream cheese and fresh smoked salmon alternative for a savory touch. Serving warm or lightly toasted enhances the crumb’s crispness and deepens the flavor, and I often recommend guests break them apart with a fork for that traditional nooks-and-crannies experience.
This recipe shines at weekend breakfasts, casual brunches with friends, or even afternoon tea. I like to plate them modestly—two muffins per person, arranged on a wooden board with fresh fruit and small bowls of jams, nut butters, or honey for dipping. For drinks, I find a warm herbal tea or a fresh-pressed juice complements these muffins beautifully, balancing their mild sweetness and making each bite feel like a comforting treat.
Because they hold up so well, these muffins are fantastic for meal prep too. I often toast leftovers in the morning and enjoy them with a drizzle of almond butter and sliced banana for a quick, nutritious start. The versatility keeps me coming back to this recipe again and again.
Variations
I’m always experimenting with different twists on the Gluten-Free English Muffins Recipe. One easy substitution is swapping oat flour with sorghum or millet flour for a different flavor note and equally great texture. If you’re avoiding oats for allergy reasons, these alternatives work wonderfully. For a vegan approach, this recipe is already friendly since it contains no eggs or dairy, but I sometimes add a teaspoon of maple syrup in place of sugar for a richer sweetness.
Flavor-wise, I’ve tried mixing in herbs like rosemary or thyme into the dough for a savory muffin that pairs beautifully with cheese and veggie spreads. Another fun variation is adding a handful of finely chopped sun-dried tomatoes or olives for a Mediterranean twist. For cooking methods, while I stick to skillet and oven baking for that authentic muffin crust, you could experiment with an electric griddle set to medium heat for batch cooking or even try an air fryer approach for a faster cook time with crispy edges.
What really excites me about this recipe is its adaptability to suit personal tastes and dietary needs without sacrificing the texture and flavor I love, so feel free to get creative and make it your own!
Storage and Reheating
Storing Leftovers
I keep leftover gluten-free English muffins in an airtight container at room temperature, and they stay fresh for about two days. Using a container with a secure lid helps maintain moisture and prevents them from drying out too quickly. If I know I won’t finish them within that time, I move straight to freezing to preserve their best qualities.
Freezing
These muffins freeze beautifully and freezing is my go-to for making a big batch last. I individually wrap each muffin in parchment paper or plastic wrap, then place them in a freezer-safe zip-top bag or container. They keep well frozen for up to three months. When you’re ready to enjoy, simply thaw at room temperature for about 30 minutes before reheating, or pop them straight in the toaster for convenience.
Reheating
To revive your muffins’ texture and flavor, I recommend reheating them in a toaster or toaster oven rather than a microwave, which can make them gummy. Toasting brings back the delightful crunch and warm crumb just like fresh. Alternatively, warming them briefly in a lukewarm oven also works well—about 5-7 minutes at 300°F will do the trick. Avoid overheating to keep them from drying out.
FAQs
Can I use a different flour instead of oat flour?
Absolutely! While oat flour adds a nice mild sweetness and tenderness, you can substitute it with other gluten-free flours like sorghum, millet, or buckwheat flour, adjusting the quantity slightly if needed to achieve the right dough consistency.
Is this recipe suitable for vegans?
Yes! This recipe is naturally vegan since it uses no animal products. Just be sure to use organic cane sugar if you want to avoid refined sugar processed with bone char, and check that your yeast is vegan-friendly.
Can I make the dough ahead of time?
Definitely! This dough can be refrigerated for up to 12 hours after the first rise and before shaping, which makes it perfect for prepping the night before breakfast. Just bring it back to room temperature before continuing with the steps for best results.
What else can I use instead of ground chia seeds?
If you don’t have chia seeds, ground flaxseed meal is a great substitute and will still help bind the dough in a gluten-free way. Use the same quantity for a similar effect.
How do I know when the muffins are fully cooked?
The cooked muffins should have a firm crust and sound hollow when you tap them lightly on the bottom. The oven baking step solidifies the crust, so don’t skip it. If the muffins feel doughy or soft, bake a few more minutes until firm.
Conclusion
If you’re looking for a Gluten-Free English Muffins Recipe that truly delivers on flavor, texture, and ease, I can’t recommend this one enough. It’s become a treasured favorite in my kitchen for good reason—the nooks and crannies, the tender crumb, and that golden crust all come together perfectly. I hope you enjoy making and sharing these muffins as much as I do, turning simple ingredients into warm, comforting bites that feel like home.
PrintGluten-Free English Muffins Recipe

These Gluten-Free English Muffins are a delicious homemade alternative to store-bought versions, crafted from a blend of gluten-free flours and chia seeds for a soft, tender texture with a perfectly crusty exterior. Their preparation involves natural yeast fermentation, skillet cooking, and oven finishing, resulting in muffins ideal for toasting and topping with your favorite spreads.
- Prep Time: 1 hour 45 minutes
- Cook Time: 25 minutes
- Total Time: 2 hours 10 minutes
- Yield: 6 English muffins
- Category: Breakfast
- Method: Stovetop
- Cuisine: American
- Diet: Gluten Free
Ingredients
Wet Ingredients
- 1 cup warm water (divided, 100-110°F / 38-43°C)
- 1 Tbsp cane sugar (organic for vegan-friendly)
- 1 ½ tsp active dry yeast
- 1 Tbsp ground chia seeds
- 2 tsp avocado oil (for greasing pan)
Dry Ingredients
- ¾ cup brown rice flour
- ½ cup tapioca starch (also called tapioca flour)
- ⅓ cup potato starch (NOT potato flour)
- ⅔ cup oat flour (divided; certified gluten-free as needed)
- 1 tsp sea salt
- ¼ tsp baking powder
- 2 Tbsp cornmeal (divided; optional)
Instructions
- Bloom the yeast: In a medium mixing bowl, whisk together ¾ cup (180 ml) of warm water and the cane sugar until dissolved. Add the active dry yeast and let it sit on the counter for 10 minutes until frothy. If it doesn’t foam, start over as the water temperature may have been incorrect or the yeast expired.
- Gel with chia seeds and mix dry ingredients: Whisk ground chia seeds into the yeast mixture and let it gel for about 5 minutes. Meanwhile, in a large bowl, whisk brown rice flour, tapioca starch, potato starch, ⅓ cup oat flour, and sea salt together.
- Combine wet and dry ingredients: Add the wet mixture to the dry ingredients and stir with a wooden spoon until a thick, dense dough forms. Knead by hand for a few minutes to combine thoroughly. Cover with a clean kitchen towel and let rise in a warm spot for 1 hour.
- Add baking powder mixture and rest: Dissolve baking powder in the remaining ¼ cup warm water. Add this to the risen dough and mix well with a wooden spoon or hand mixer until lumps break down and the dough becomes thick and sticky. Cover and rest again for 30 minutes in a warm place.
- Prepare for shaping: Sprinkle 1 tablespoon cornmeal evenly on a baking sheet and preheat the oven to 350°F (176°C). Stir the remaining ⅓ cup oat flour into the dough. If too sticky, add oat flour 1 teaspoon at a time until manageable. Optionally, refrigerate the dough for up to 12 hours before shaping.
- Shape the muffins: Divide dough into 6 even pieces and shape each into a flat round about 3 inches wide and ½ inch thick. Place them on the prepared baking sheet and sprinkle the remaining 1 tablespoon cornmeal evenly over the tops.
- Cook on stovetop: Heat 1 teaspoon avocado oil in a cast iron skillet, griddle, or non-stick pan over medium-high heat until shimmering, then reduce to medium. Add as many muffins as fit without crowding. Cook 4-5 minutes until golden on the first side, then flip and cook 3-4 minutes on the other side. Transfer cooked muffins to the baking sheet and repeat with remaining muffins.
- Bake to finish: Place the baking sheet with cooked muffins in the oven and bake for 10-15 minutes until the outside is firm, crusty, and muffins sound hollow when tapped.
- Cool and serve: Let the muffins cool 10-15 minutes. Use a fork to split them by poking around the edges to pull apart the sections. Serve immediately with jam, butter, or toast for extra crispiness. Store leftovers in an airtight container at room temperature for up to 2 days; reheat in a toaster.
Notes
- Ensure water temperature for yeast blooming is between 100-110°F (38-43°C) for proper activation.
- Use ground chia seeds as a natural binder to improve texture and moisture retention.
- Certified gluten-free oat flour is recommended for those with gluten sensitivities.
- Cornmeal helps to prevent sticking and adds texture but is optional based on preference.
- Refrigerating the dough up to 12 hours can improve flavor and make it easier to shape.
- Cook muffins on medium to prevent burning and ensure even cooking across both sides before finishing in the oven.
- Splitting the muffins with a fork helps maintain the classic nooks and crannies texture.
- Store muffins in an airtight container at room temperature; best reheated in a toaster to restore crispness.



Leave a Reply