
I absolutely love sharing this Candy Corn Cookies Recipe with anyone looking to add a playful touch of fall to their baking adventures. These cookies perfectly capture the festive colors of candy corn while delivering a tender, buttery texture with just the right balance of sweetness. They’re so much fun to make and even better to eat, especially when the kitchen is filled with the warm scents of vanilla and almond. If you enjoy baking unique treats that wow your friends and family visually and on the palate, this recipe is definitely one I keep coming back to.
Why You'll Love This Candy Corn Cookies Recipe
From the very first bite, you’ll notice how this recipe blends the rich creaminess of butter and cream cheese with the soft crumb of a perfectly balanced cookie dough. I find the flavor profile delightful—the subtle hint of almond extract adds an unexpected but welcome depth that enhances the vanilla without overwhelming it. The tri-color layers are not just eye candy but also offer a fun way to enjoy a beloved seasonal motif that reminds me of cozy autumn days and happy Halloween celebrations.
One of the best parts about this Candy Corn Cookies Recipe is just how approachable it is. Despite looking impressive, the dough comes together quickly with simple ingredients, and you don’t need to be a baking expert to get beautiful results. Whether I’m making them for a last-minute party or prepping ahead for a holiday gathering, they come out consistently charming and delicious. They’re also wonderfully versatile—perfect for cookie exchanges, festive treats for kids, or just a cheerful snack alongside a hot cup of tea or cider. You’ll find these cookies have a way of brightening any occasion.
Ingredients You'll Need
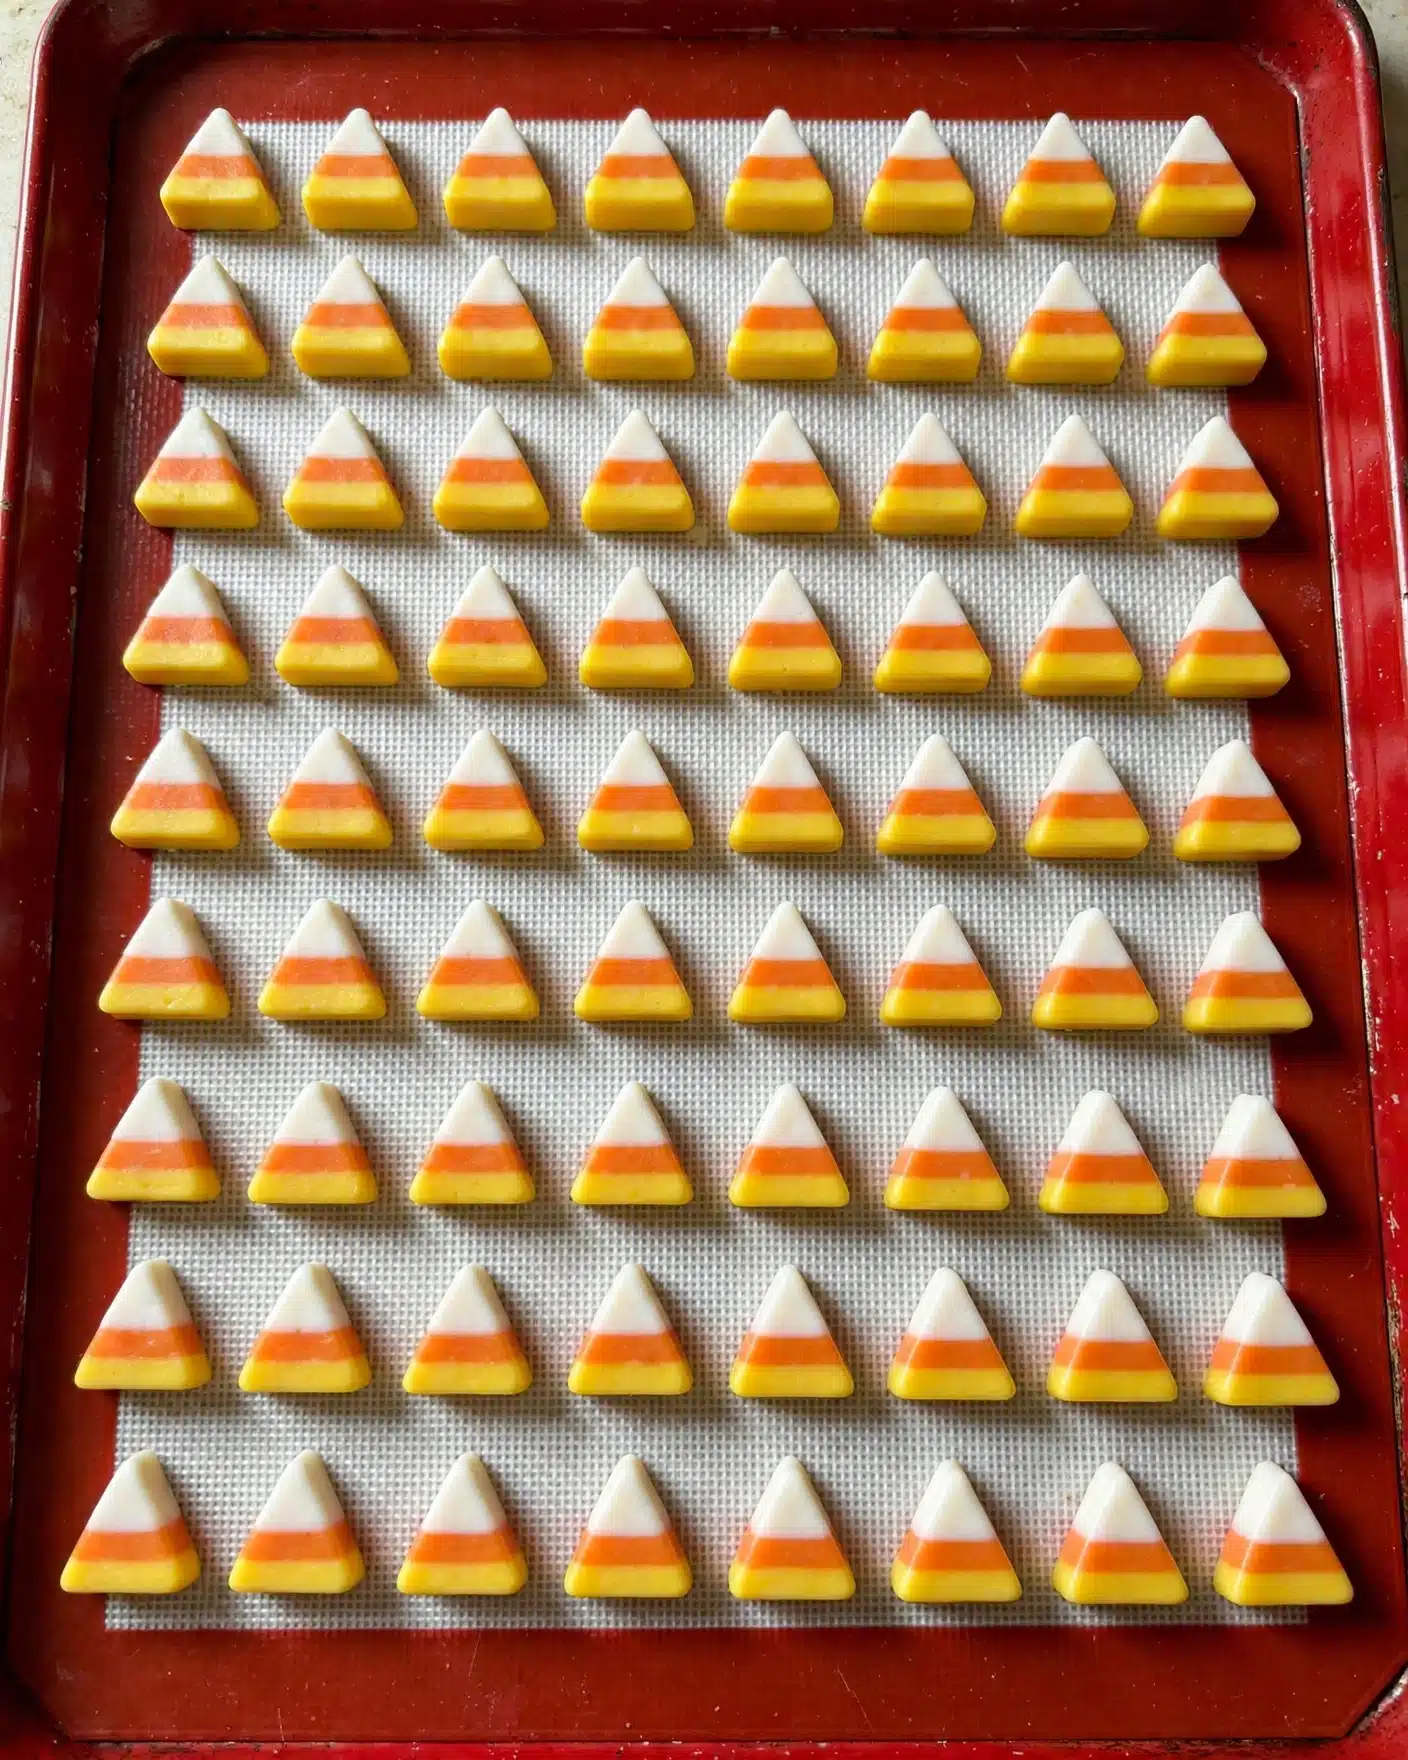
For this recipe, I rely on a handful of straightforward but essential ingredients that each play a key role in the cookie’s taste, texture, and vibrant appearance. The butter and cream cheese contribute to a tender, melt-in-your-mouth feel, while the flour and cornstarch keep everything light and soft. Gel food coloring brings the classic candy corn look to life without altering the flavor.
- Unsalted butter: Provides a rich, creamy base that makes the cookies tender and flavorful.
- Cream cheese: Adds moisture and a subtle tanginess that keeps the cookies soft and delicate.
- Granulated sugar: Sweetens the dough and helps create a lightly crisp exterior.
- Egg yolk: Contributes to a rich texture and binds the dough together effectively.
- Vanilla extract or vanilla bean paste: Offers sweet, aromatic notes that complement the subtle almond flavor.
- Almond extract (optional): Enhances the cookie’s complexity with a warm, nutty tone.
- All-purpose flour: Forms the structure of the cookies, balanced with cornstarch for tenderness.
- Cornstarch: Softens the crumb, ensuring these cookies aren’t dense at all.
- Fine salt: Balances the sweetness and enhances overall flavor.
- Baking powder: Provides a gentle lift so the cookies aren’t too flat.
- Yellow and orange gel food coloring: Gives vibrant hues without affecting texture or taste.
Directions
Step 1: In a large mixing bowl or stand mixer, beat the unsalted butter and cream cheese on medium speed until completely smooth and creamy. This step is key to getting a tender cookie, so don’t rush it!
Step 2: Add the granulated sugar and continue mixing on medium-high speed for about two minutes, or until the mixture lightens in color and becomes fluffy. You’ll notice how this helps incorporate air, making the dough lighter.
Step 3: Next, mix in the egg yolk, vanilla extract (or vanilla bean paste), and almond extract if you’re using it. Mix on medium speed until everything is fully incorporated. I usually scrape the sides and bottom of the bowl with a spatula to make sure nothing gets missed.
Step 4: Now, add the flour, cornstarch, salt, and baking powder to the bowl. Mix on low speed JUST until the dry ingredients are combined with the wet. Overmixing here can toughen the dough, so stop as soon as you see no streaks of flour.
Step 5: Divide your sticky dough into three equal portions. Leave one plain (white), color one portion yellow, and the other orange using gel food coloring. Wrap each individually in plastic wrap. I find gently flattening these into rectangles about ⅓ inch thick helps when rolling later.
Step 6: Chill the dough in the fridge for at least 30 minutes, or up to overnight—which I personally love because it gives the dough great flavor and consistency. If you refrigerate overnight, let the dough sit for about 5 minutes at room temperature before rolling.
Step 7: Preheat your oven to 350°F (175°C) and prepare your baking sheets with silicone mats or parchment paper.
Step 8: Roll out the three dough portions individually on lightly floured plastic wrap to ¼ inch thickness. Then stack them in the order of yellow on bottom, orange in the middle, and white on top. Use your rolling pin gently to press them together so they adhere into a tri-color slab.
Step 9: Use a sharp knife to cut long strips about ⅓ inch wide, then slice triangles from these strips to mimic candy corn shapes. This shaping is so fun and really brings the concept to life!
Step 10: (Optional) Toss the shaped cookies in granulated sugar for a little crunch and extra sparkle, though it does slightly change their classic look.
Step 11: Place the cookies on your baking sheets about a half-inch apart, chill the trays for 15 minutes in the fridge or 5 minutes in the freezer to help maintain the shapes during baking.
Step 12: Bake one sheet at a time for 8 to 12 minutes, rotating halfway for even baking. Keep a close eye to avoid browning the edges. The cookies should be slightly firm on the outside but still soft to the touch. Let them cool completely on the pan before enjoying the magic!
Servings and Timing
This recipe makes approximately 225 small candy corn cookies—perfect for large gatherings or gift-giving! Prep time is about 25 minutes, including mixing and dividing the dough, plus at least 30 minutes of chilling. Baking takes about 8 to 12 minutes per batch, with some additional time for cooling. Altogether, you’re looking at roughly 1 hour from start to finish, depending on how long you chill your dough. The chilling is important for ease of rolling and keeping the cookie shapes sharp, so don’t skip it!
How to Serve This Candy Corn Cookies Recipe

I love serving these cookies as part of a festive autumn dessert spread. They pair beautifully with a warm cup of spiced tea or hot apple cider, balancing the rich butteriness with some seasonal warmth. If you’re hosting a Halloween party or fall gathering, they’re a colorful and playful addition that always draws compliments.
For a truly fun presentation, I arrange them on a rustic wooden platter or a crisp white cake stand to make the vibrant orange, yellow, and white colors pop. Sprinkling a few edible gold or orange sugar crystals nearby adds some sparkle without taking away from the classic candy corn aesthetic. These cookies really shine when served at room temperature, allowing their tender texture and subtle flavors to come through fully.
Besides dessert tables, I like to package them in clear cellophane bags tied with autumnal ribbons for thoughtful homemade gifts. They’re small and portable, making them a wonderful treat to share with neighbors, friends, or coworkers. Whether for a casual weeknight treat or a big holiday bash, these cookies bring a smile every time.
Variations
One of the fun parts about making this Candy Corn Cookies Recipe is how easy it is to customize. If you prefer a dairy-free version, I’ve tried substituting the butter and cream cheese with vegan butter and vegan cream cheese, and the cookies still come out wonderfully soft—just make sure your vegan substitutes are firm and chilled well. For a gluten-free twist, swapping the all-purpose flour for a gluten-free flour blend with xanthan gum helps maintain texture while keeping everyone at the table happy.
If you want to play with flavors, you can experiment by swapping out almond extract for a little orange zest to bring a bright citrus note that complements the candy corn theme perfectly. Sometimes I like to add a pinch of cinnamon or pumpkin pie spice to add warmth, especially during the cooler months. For a different cooking method, rolling the dough into balls and pressing a candy corn piece on top before baking makes an even quicker and less fussy treat without losing any charm.
Feeling adventurous? Try sandwiching two small candy corn cookies with a thin layer of cream cheese frosting tinted orange or yellow. This adds a creamy burst between the delicate cookies and turns them into mini seasonal sandwich cookies—always a hit at fall parties.
Storage and Reheating
Storing Leftovers
I recommend storing leftover Candy Corn Cookies in an airtight container at room temperature. They keep beautifully for up to 5 days while maintaining their softness and flavor. If you want to keep their freshness longer, placing a slice of bread in the container helps preserve moisture. Avoid stacking them too tightly to prevent breaking or sticking.
Freezing
Freezing is a great option if you want to prep these cookies ahead of time. I usually flash freeze the unbaked cookie triangles on a tray for about an hour, then transfer them to a freezer-safe bag or container. They keep well frozen for up to 2 months. When you’re ready, you can bake the cookies straight from frozen—just add an extra minute or two to the bake time and keep an eye on them.
Reheating
If you have baked cookies that need a little revival, warming them gently in a preheated oven at 300°F for 3 to 5 minutes works wonders to regain a fresh-baked softness. Avoid microwaving, which can make them overly soft and chewy in an unpleasant way. Letting them come to room temperature after reheating helps restore their delicate texture perfectly.
FAQs
Can I make the dough ahead of time and freeze it?
Absolutely! This dough freezes very well. I recommend dividing and wrapping the dough portions tightly in plastic wrap and freezing for up to 2 months. Thaw in the fridge overnight before rolling and slicing as usual.
What if I don’t have gel food coloring? Can I use liquid?
Gel food coloring is best here because it provides vibrant hues without altering the dough’s consistency. Liquid food coloring can make the dough too wet and sticky. If liquid is all you have, add a few drops very sparingly and adjust with a little extra flour if needed.
Do these cookies spread or lose their shape while baking?
Because the dough is fairly firm and chilled before baking, these cookies hold their shape very well and do not spread much. Chilling both the dough and the shaped cookies before baking helps maintain their crisp candy corn look.
Can I use almond extract if I’m allergic?
If you have a nut allergy or prefer to avoid almond extract, you can simply omit it or replace it with an extra teaspoon of vanilla extract. The cookies will still be delicious and tender with plenty of flavor.
Are these cookies crunchy or soft?
These cookies are tender with a soft crumb and a slight crispness on the edges. They aren’t crunchy like a biscotti but have a delightful melt-in-your-mouth texture that keeps me coming back for more.
Conclusion
If you’re looking for a festive, charming cookie that’s both fun to make and delightful to eat, this Candy Corn Cookies Recipe is a treasure. I love how it brings a smile with every colorful bite and how easy it is to share that joy with loved ones. Whether you’re baking for holidays, parties, or just a cozy day at home, these cookies make every moment sweeter. I hope you enjoy making and indulging in them as much as I do!
PrintCandy Corn Cookies Recipe

Candy Corn Cookies are festive, colorful treats perfect for Halloween or any fun occasion. These buttery, soft cookies feature vibrant layers of white, yellow, and orange dough stacked and shaped to resemble candy corn. They are lightly flavored with vanilla and a hint of almond extract, baked to a tender finish with a slight crust on the outside. Fun to make and delightful to eat, these cookies bring a playful spirit to your dessert table.
- Prep Time: 25 minutes
- Cook Time: 12 minutes
- Total Time: 1 hour
- Yield: Approximately 225 cookies
- Category: Dessert
- Method: Baking
- Cuisine: American
Ingredients
Wet Ingredients
- ½ cup (1 stick) unsalted butter, room temperature (113g)
- ¼ cup (2 oz) full fat cream cheese, room temperature (56g)
- 1 large egg yolk (20g)
- 1 tsp vanilla extract or vanilla bean paste (5g)
- 1 tsp almond extract, optional (5g)
Dry Ingredients
- 1 cup granulated sugar (200g)
- 2 cups all-purpose flour (260g)
- 2 tsp cornstarch (5g)
- ½ tsp fine salt
- ¼ tsp baking powder
Additional
- Yellow and orange gel food coloring
- Granulated sugar, optional, for coating
Instructions
- Prepare the butter and cream cheese: In a large bowl or stand mixer bowl, beat together the unsalted butter and cream cheese on medium speed until smooth and well combined.
- Add sugar and mix: Incorporate granulated sugar and mix on medium-high speed for a couple of minutes until the mixture is lighter in color and fluffy.
- Add egg yolk and extracts: Mix in the egg yolk, vanilla extract or vanilla bean paste, and optional almond extract on medium speed until fully incorporated, scraping down the bowl as needed.
- Incorporate dry ingredients: Add the all-purpose flour, cornstarch, salt, and baking powder. Mix on low speed just until everything is combined, making sure not to overmix. Scrape down the bowl to ensure even mixing.
- Divide and color dough: Divide the sticky dough into three equal parts. Leave one portion plain (white), color one portion yellow, and one portion orange using gel food coloring. Flatten each portion into approximately ⅓ inch thick rectangles, wrap in plastic wrap for easier rolling later.
- Chill the dough: Refrigerate the wrapped dough for about 30 minutes, or freeze for 10 minutes. Dough can also be chilled overnight; if so, let rest at room temperature for 5 minutes before rolling.
- Preheat oven and prepare baking sheets: Heat oven to 350°F (175°C) about 30 minutes before baking. Line two large baking sheets with silicone mats or parchment paper.
- Roll out dough portions: Remove plastic wrap and dust dough and rolling pin with flour lightly. Roll each dough portion to ¼ inch thickness on the plastic wrap.
- Stack and seal layers: Place the rolled yellow dough on a flat surface, then place orange dough on top, then white dough on top of orange. Use the rolling pin to gently press the layers so they stick together.
- Cut cookies: Using a large sharp knife, cut the stacked dough into ⅓ inch wide strips. Then cut tall, narrow triangles from these strips to mimic candy corn shapes.
- Optional sugar coating: Toss cookies in granulated sugar if desired, which adds a slight crunch but reduces the realistic candy corn look.
- Arrange cookies for baking: Place cookies on prepared baking sheets with ½ inch spacing, as they will not spread much during baking.
- Chill cookies before baking: Chill the cookie trays in the fridge for 15 minutes or freezer for 5 minutes to help the cookies keep their shape.
- Bake the cookies: Bake one sheet at a time on the middle oven rack for 8-12 minutes, rotating halfway through. The cookies should be lightly firm on the outside but still soft inside—avoid browning edges. Test doneness by gently pressing; slight softness is okay.
- Cool: Let cookies cool completely on the baking sheets before serving.
Notes
- Using gel food coloring prevents dough from becoming too wet compared to liquid colorings.
- Chilling the dough thoroughly helps maintain defined candy corn layers and prevents spreading during baking.
- If chilling overnight, allow dough to warm slightly before rolling for easier handling.
- Cookies continue to firm up after baking, so be careful not to overbake.
- Cookie thickness and size can be adjusted, but baking times may vary accordingly.
- This recipe can be doubled but bake on separate sheets to avoid overcrowding.




Leave a Reply