
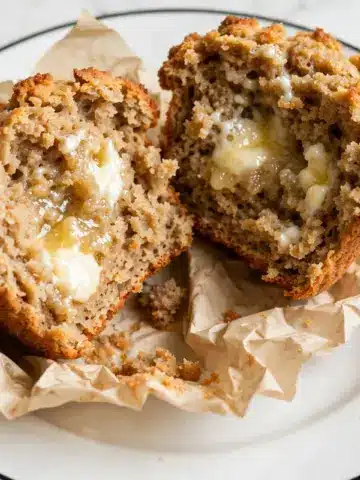
I absolutely adore baking biscuits, and this is genuinely The Best Homemade Biscuits Recipe I've discovered. I love how these biscuits come out flaky, tender, and perfectly buttery every single time. They have just the right balance of fluffy softness with a slightly crisp golden top, making them ideal for breakfast, dinner, or any snack craving. I swear once you make this recipe, you’ll never want to buy biscuits from the store again.
Why You'll Love This The Best Homemade Biscuits Recipe
What truly stands out to me about this recipe is the flavor profile. The subtle tang from the vinegar mixed with the buttery richness results in biscuits that are light but packed with flavor. The touch of sugar adds a hint of sweetness, making each bite incredibly satisfying without overpowering the savory notes. When I first took a bite, I was amazed at how moist and fluffy the inside was, combined with a tender crust. It’s that perfect contrast that keeps me coming back to this recipe again and again.
Another thing I adore is how straightforward this recipe is, especially for something that seems so fancy. I appreciate recipes that don’t require a million steps or exotic ingredients, and this one fits the bill perfectly. Using simple staples like flour, butter, baking powder, and milk—ingredients I usually have on hand—makes pulling these biscuits together easy and quick. Plus, the method of folding the dough a few times creates those beautiful layers that I love without any complicated techniques.
Ingredients You'll Need

Honestly, the beauty of this recipe lies in its simplicity. Each ingredient serves a clear purpose, from the flour providing structure to the cold butter creating those crucial flaky layers. The baking powder and baking soda work in harmony to give the biscuits a lovely rise, and the milk with vinegar adds just the right amount of tang and moisture to keep things soft and tender. Here’s exactly what I use to whip these up:
- All-purpose flour: This forms the body of the biscuits, use gluten-free flour if you need a gluten-free option.
- Baking powder: It’s the main leavening agent that helps the biscuits rise beautifully.
- Granulated sugar: Adds a gentle sweetness to balance the flavors.
- Fine salt: Enhances flavor and balances the sweetness perfectly.
- Baking soda: Works alongside vinegar to give a light texture and slight tenderness.
- Cold unsalted butter: The key to flaky layers—keeping it cold is essential for buttery pockets.
- Milk of choice: I recommend whole or 2% for the best texture and richness.
- White vinegar: Adds a bit of tang that reacts with baking soda to give lift and moist crumb.
Directions
Step 1: Preheat your oven to 425℉. Prepare a baking sheet by lightly misting it with cooking spray or lining it with parchment paper. This step ensures your biscuits won't stick and will have a clean surface to bake on.
Step 2: In a large mixing bowl, whisk together the flour, baking powder, sugar, salt, and baking soda until well combined. This evenly distributes the rising agents and flavorings throughout the flour.
Step 3: Grate the cold butter directly into the flour mixture using a box grater. If you don’t have a grater, chop the butter into very small pieces quickly to keep it from melting. The cold butter is critical for creating that flaky texture.
Step 4: Use a fork or pastry blender to work the butter into the flour mixture. You want it to resemble coarse crumbs with some pea-sized pieces of butter remaining. Avoid using your hands here to prevent warming the butter.
Step 5: Make a well in the center of your dry ingredients and pour in the milk mixed with vinegar. Gently stir until you get a soft, craggy dough. Remember, not all of the flour will incorporate, and that’s perfectly normal!
Step 6: Turn the dough out onto a lightly floured surface. Quickly pat it into a 1-inch-thick rectangle with your hands.
Step 7: Fold the dough in half, then press it back into a 1-inch-thick rectangle. Repeat this fold-and-press step four more times. This technique creates those flaky layers without heavy kneading.
Step 8: After the final fold, shape the dough into a 1-inch-thick rectangle and tidy up the edges with your hands or a bench scraper.
Step 9: Cut the dough into 8 equal squares using a sharp knife or bench scraper. Place them on your prepared baking sheet, spacing each about 1 to 2 inches apart to allow even rising.
Step 10: Bake for 12 to 13 minutes or until the tops turn a very light golden brown. Keep an eye on them to prevent over-baking.
Step 11: Remove the biscuits from the oven and immediately rub each top with a pat of cold butter. This adds extra shine and buttery flavor that I never skip. Serve the biscuits warm for the best experience.
Servings and Timing
This recipe yields 8 generous servings, perfect for sharing with a family or a small gathering of friends. It takes about 15 minutes to prep the dough if you’re familiar with the steps, and the baking time is roughly 12 to 13 minutes. Altogether, you should allow approximately 30 minutes from start to finish. There is no additional resting time necessary, which I love because these biscuits come together quickly but deliver impressive results.
How to Serve This The Best Homemade Biscuits Recipe

When I serve these biscuits, I like to enjoy them warm right out of the oven, ideally slathered with a bit of butter or your favorite jam. They make the perfect companion to a hearty breakfast of scrambled eggs or a creamy bowl of grits. For a comforting dinner, I love pairing them with chicken stew or a fresh, vibrant garden salad. The rich, buttery flavor balances sharper or more savory dishes beautifully.
For special occasions, I sometimes garnish the tops with a sprinkle of flaky sea salt or fresh herbs like finely chopped chives to elevate the presentation. Personally, I find arranging them on a wooden board or a pretty ceramic plate adds rustic charm, making the meal feel instantly homey and welcoming. Plus, they’re fantastic for brunch parties or holiday gatherings because everyone loves napkins and biscuits in hand!
For drinks, I usually go with freshly brewed coffee, a rich hot chocolate, or a fruity iced tea—these beverages complement the biscuits without overpowering their flavors. Serving the biscuits warm is key, but if you need to, you can reheat them gently so they’re soft inside while keeping the crust delicately crisp. These little details make the eating experience just that much sweeter.
Variations
I’ve found that this recipe is wonderfully flexible if you want to get creative. For example, you can swap regular all-purpose flour for a gluten-free blend with success, just be sure it contains xanthan gum or another binder to hold everything together. For dairy-free or vegan versions, I replace the butter with a plant-based alternative and use almond or oat milk, which still produces a lovely texture and flavor.
Flavor-wise, I sometimes fold in a teaspoon of fresh rosemary or a little shredded sharp cheddar cheese for a savory twist. If you fancy something sweeter, a sprinkle of cinnamon and a bit of extra sugar in the dough works beautifully. You can even mix in some mashed cooked sweet potato for added moisture and subtle sweetness. These small changes keep the recipe exciting while staying true to its flaky biscuit roots.
Another fun option is to bake the biscuits in a cast iron skillet for a more rustic look and slightly crispier edges. No matter how you adjust it, this recipe adapts easily while still delivering that irresistible biscuit texture and flavor that I love so much.
Storage and Reheating
Storing Leftovers
If you have leftovers, I recommend storing them in an airtight container at room temperature. They’ll stay fresh and soft for up to three days. I usually line the container with a paper towel to absorb any excess moisture, which helps keep the biscuits from getting soggy. Just avoid refrigeration if possible, as it tends to dry them out.
Freezing
These biscuits freeze wonderfully. To freeze, wrap them individually in plastic wrap and place them in a freezer-safe ziplock bag or container. They keep well for up to two months, making them convenient for quick breakfasts or snacks. When you need one, just thaw it at room temperature or pop it directly into the oven or toaster oven for a few minutes while still frozen.
Reheating
The best way to reheat biscuits is in the oven at 350℉ wrapped in foil for about 10 minutes, which preserves their softness without drying them out. You can also split them and toast lightly for a crisp exterior with a warm, fluffy inside. Avoid microwaving if you want to keep that wonderful flaky texture, as it tends to make biscuits rubbery or chewy instead of tender.
FAQs
Can I use cold butter straight from the freezer?
Yes! Using cold butter is crucial for this recipe to create those flaky layers. If your butter is frozen, just grate it quickly or chop it into small pieces and work fast to prevent it from warming up before mixing.
Why is there vinegar in the biscuit dough?
The vinegar reacts with the baking soda to produce carbon dioxide bubbles, which help the dough rise and result in a lighter, fluffier biscuit. It also adds a subtle tang that enhances the overall flavor.
Can I substitute the milk with a non-dairy option?
Absolutely! Plant-based milks like almond, oat, or soy milk work well in this recipe. Just be sure to use unsweetened varieties to keep the flavor balanced, and keep the acidity from the vinegar for the best rise.
How thick should I roll or pat out the dough?
Pat the dough into a 1-inch-thick rectangle before folding and after shaping the final rectangle. Keeping it at 1 inch thick ensures the biscuits bake evenly with a tender crumb and golden crust.
Can I make drop biscuits instead of cutting squares?
Yes, you can scoop the dough onto the baking sheet for drop biscuits if you prefer. The texture will be slightly different—usually less layered and flaky—but still delicious and easier to make if you're short on time.
Conclusion
I'm so excited for you to try The Best Homemade Biscuits Recipe because it's truly become a staple in my kitchen that never disappoints. Easy to make, incredibly tasty, and versatile enough for any meal, these biscuits will quickly become your go-to for comforting homemade bread. Trust me, once you taste these warm, buttery biscuits, you’ll be hooked just like I am!
PrintThe Best Homemade Biscuits Recipe

Discover the secret to light, fluffy, and tender homemade biscuits with this easy-to-follow recipe. Using simple ingredients like all-purpose flour, cold butter, and milk combined with a gentle folding technique, these biscuits bake up golden and buttery, perfect for breakfast, brunch, or as a side to any meal.
- Prep Time: 10 minutes
- Cook Time: 13 minutes
- Total Time: 23 minutes
- Yield: 8 biscuits
- Category: Baking
- Method: Baking
- Cuisine: American
- Diet: Vegetarian
Ingredients
Dry Ingredients
- 2 cups all-purpose flour, plus more for rolling (use gluten-free flour, if needed)
- 1 tablespoon baking powder
- 1 tablespoon granulated sugar
- 1 teaspoon fine salt
- ¼ teaspoon baking soda
Wet Ingredients
- 6 tablespoons cold unsalted butter, plus more for brushing
- ¾ cup milk of choice (whole or 2% dairy recommended)
- ½ teaspoon white vinegar
Instructions
- Preheat Oven and Prepare Baking Sheet: Preheat your oven to 425℉. Lightly mist a baking sheet with cooking spray or line it with parchment paper and set aside to ensure your biscuits bake evenly without sticking.
- Mix Dry Ingredients: In a mixing bowl, whisk together the flour, baking powder, sugar, salt, and baking soda until well combined for a uniform base.
- Incorporate the Butter: Using a box grater, grate the cold butter directly into the flour mixture. Alternatively, chop the butter into very small pieces. Work quickly to keep the butter cold for the best texture.
- Cut Butter into Flour: Use a fork or pastry blender to work the grated butter into the flour until the mixture resembles coarse crumbs, being careful not to melt the butter by using your hands.
- Add Milk and Vinegar: Make a well in the center of the flour mixture and pour in the milk and vinegar. Stir gently until a soft, craggy dough forms with some lumps remaining.
- Turn Out Dough: Transfer the dough and any loose flour onto a lightly floured surface for shaping.
- Shape Dough into Rectangle: Quickly pat the dough with your hands into a 1-inch thick rectangle to begin forming the biscuit layers.
- Fold and Press Dough: Fold the rectangle in half, then press it back out into a rectangle. Repeat this folding and pressing process four more times to build flaky layers and fully incorporate the flour.
- Final Shape: After the fifth fold, shape the dough into one last 1-inch thick rectangle with tidy edges, ready for cutting.
- Cut the Biscuits: Use a bench scraper or sharp knife to cut the dough into 8 equal squares for even baking.
- Arrange and Bake: Place the biscuit squares on the prepared baking sheet, spaced 1 to 2 inches apart. Bake for 12-13 minutes or until the tops are lightly golden brown.
- Butter the Tops and Serve: Once baked, remove the biscuits from the oven and rub the tops with a pat of cold butter for extra richness. Serve warm for the best flavor and texture.
- Storage: Store any leftover biscuits in an airtight container at room temperature for up to 3 days to keep them fresh.
Notes
- For fluffier biscuits, keep the butter and milk as cold as possible before mixing.
- Do not overwork the dough to maintain tenderness.
- Using a box grater for the butter ensures smaller pieces for flakier biscuits.
- White vinegar adds a slight tang and reacts with baking soda for better rise.
- If using gluten-free flour, adjust the amount slightly for proper dough consistency.
- Brush with butter immediately after baking for a soft, flavorful crust.
- Biscuits are best eaten fresh but can be warmed in the oven the next day.



Leave a Reply